
NOTE I'm not an expert on anything and any technical terms used in this tutorial were probably made up by me on the spot. If you know another way of doing things, or want to try something else, that's great! Go ahead! This is just how I do things. It might not be the best way, or the easiest, or the way that suits you and that's ok. You might prefer fantasy characters, or a more cartoonish style, or something photo-realistic. Take the information you can use and adapt it to suit you.
What you need:-
- Paper to draw on
- Pencil for drawing
- Pen for outlining
- Eraser
- Graphite stick or soft dark lead pencil for transferring
- A template
As with any art project your materials don't actually need to be the best quality or the most expensive, they just have to be suitable for what you want. For instance the pens I use are probably one of the cheapest, ordinary, ball-point pens out there but I like them because they draw with a fine line and the ink dries waterproof. What you need will depend on what you plan on doing. If you're going to colour with pencils, you'll want paper that picks up pencil well. If you're going to colour with marker, you'll need paper that markers don't bleed on. If you're going to colour with paint, you'll need paper that can get wet without falling apart. And the same goes for the rest of your materials.
I'm really fussy about paper and will only use Spirax brand cartridge paper. . . actually I'm so fussy that I'll only use the back side of the sheets in this book! If I find I've accidentally drawn on the front side, I get very annoyed. I also prefer mechanical pencils to normal pencils. They give a finer line and are less likely to have scratchy imperfections in the lead. As far as pens go, I'm happy with any black pen that gives a fine line and dries water-proof. The water-proof part is because I paint my dolls with watercolours. But whatever you're comfortable using is fine. You might be more comfortable using a thick pen, or colouring with pencils, or markers, or eye shadow. It really doesn't matter what you're using, as long as you're comfortable using it and it works on the paper or with the pen you're using.
Templates.
The most important part is the template. You can't make a paper doll without a template. A template is an outline of a body that is used to draw both the doll and the clothes. It can be anything you want - a lady, a child, an elf, a cat. My templates tend to be human children because I'm not overly into fantasy characters and I couldn't draw a pair of boobs to save my life.
There are two basic types of templates. Arms In and Arms Out.
An Arms In template has the arms in front of or behind the body as much as possible. Like this. . .


Or by their sides

Or slightly more complicated, they could be holding a doll, or a bouquet, or a purse

Or you can even go all out with complicated poses

These can be a lot of fun but they are more work to both draw and colour. You have to redraw the arms and hands for each outfit which means once you've coloured an outfit you can only use it with dolls that have the exact same skintone which can be irritating. And sometimes you can end up with an outfit whose skin doesn't quite match any doll you've made at all. It also doesn't really lend itself very well to making separate clothing items, it's much easier to make entire outfits this way.
I used to draw ALL of my dolls Arms In because as a kid I found it fun. As an adult I prefer to do my dolls Arms Out because I hate drawing hands, it gets hard to think up poses after a while, and I started to get a bit too insanely ambitious in my posing/backgrounds and would draw things like this

Which is very lovely but a pain in the neck to have to paint. (I'm talking about the outfit with the dollhouse. The jug, I was fine with.)
An Arms Out template has the arms away from the body like this

You only have to draw clothes for a doll drawn from an Arms Out template. You only have to colour skin on the dolls. This style lends itself more to mix and match separates, which I like. And you only ever have to draw hands when you're making the doll or gloves, which makes me happy. And you can make a variety of dolls with a variety of skintones and they can all wear the same clothes. And that's the sort of doll I'm going to show you how to make.
Not all templates are quite so simply Arms In or Arms Out. Some have one arm in, the other out. I find it easiest to keep it simple though.
I'm not going to show you how to draw a template because I hate doing that so much that I will use the same template for ten years or more to avoid drawing a new one. But I will provide you with some templates you can print out if you're too lazy or scared to draw one too. (OR if you've seen a printable paper doll anywhere on line that you like, you could print that and trace it to make a template and make clothes to fit that doll.)


The second template is the one I used to draw the dolls I posted the other week. The third template may look like it's just the second one repeated but it's not only bigger but also taller and thinner. The last template is the one I'm going to be using.
Drawing your doll.
Cut one of the templates off the template sheet you're using. Not along the lines. At all. You want to end up with a rectangle of paper with a line drawing of a person on it. Turn the paper over and colour in the back (the side with no drawing on it) with lead pencil. I use graphite sticks because I have them and wasn't using them. Otherwise I'd usually use a 2B, 3B, or 4B pencil. (6B is too messy, but anything lighter than 2B isn't dark enough.) I don't know what that is in the American pencil grading system but basically you want a lead pencil that's soft and dark. So you end up with a piece of paper with the template printed on one side and heavy graphite on the other like this

Place the template on your sheet of paper, graphite side down. So you can see the picture and the dark side you've coloured is resting on the paper. Holding the piece of paper in place with one hand, use a pen to trace over the lines that are printed on your template. Press a little bit so the graphite from the back of the template is transferred to your paper (but not so hard you're leaving huge dents in the paper) and you should end up with a graphite copy of the template on your paper like this
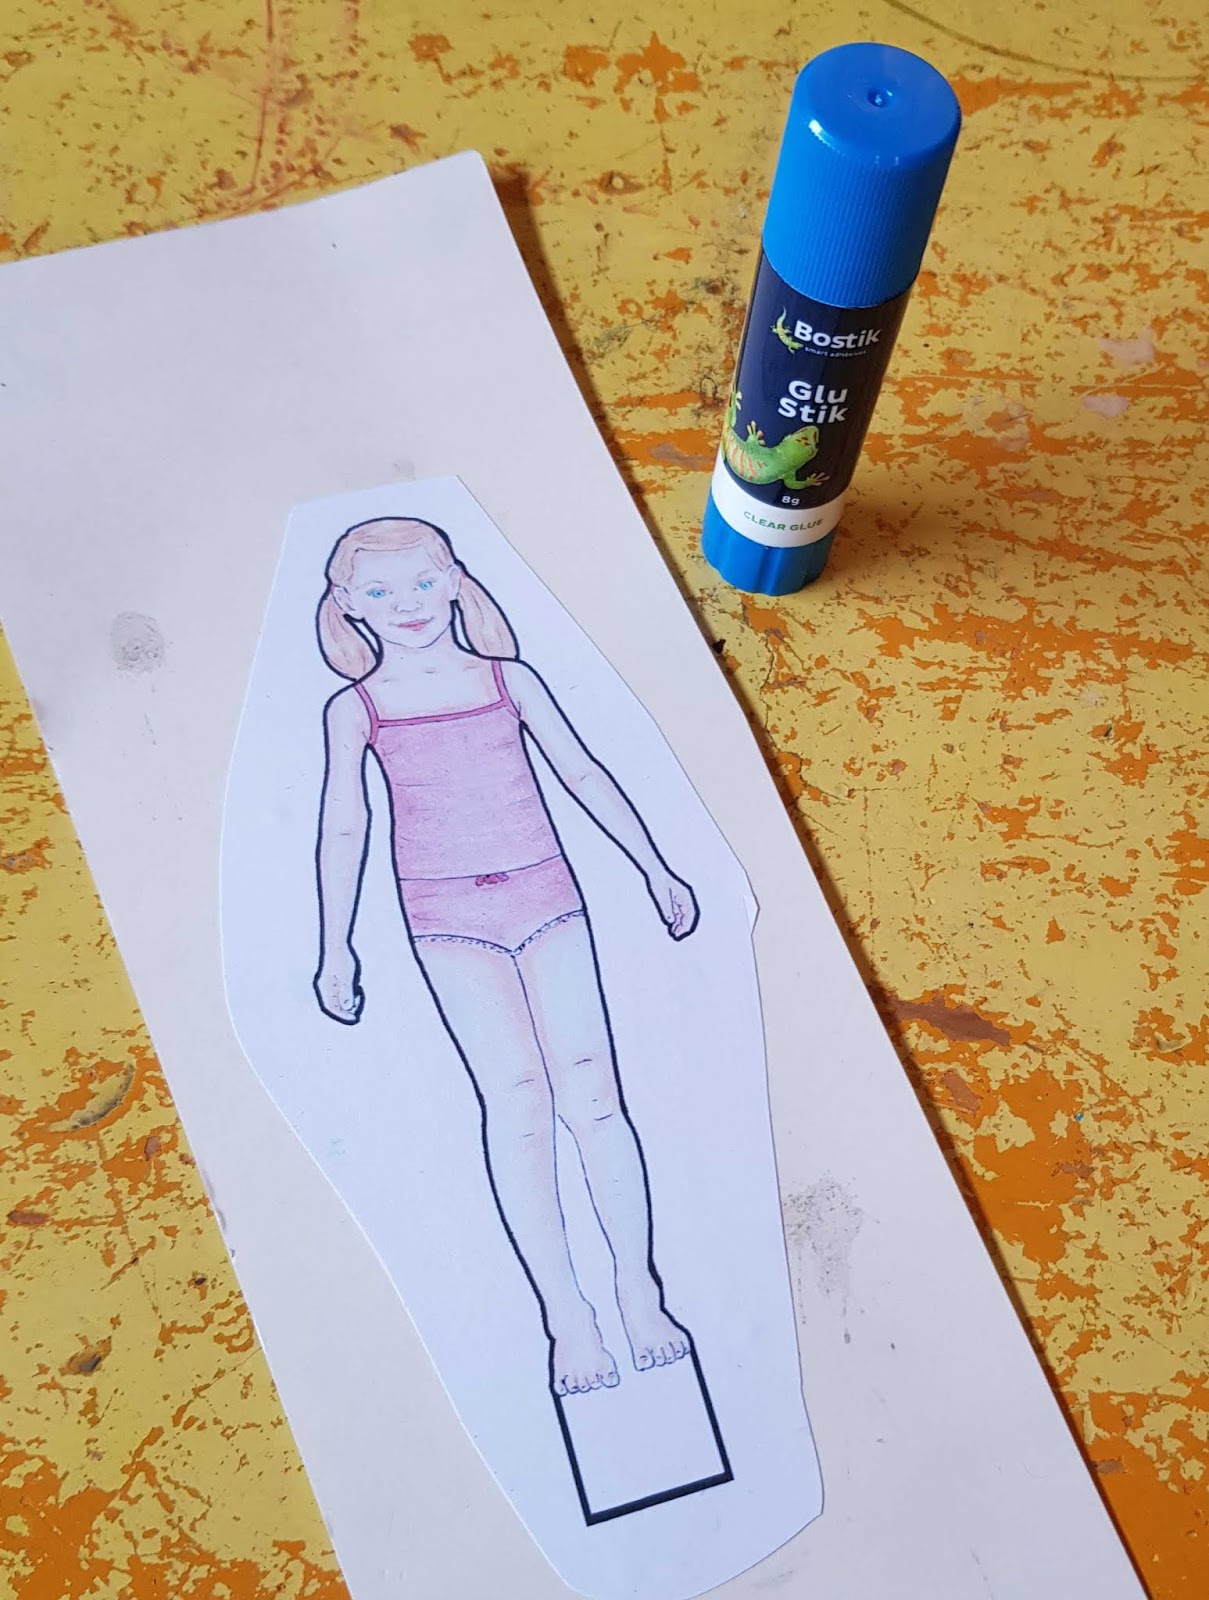
Then sketch in underwear (or dancewear, or swimwear), facial features, hair etc with pencil. I use the facial features of the templates to give me an idea of where the facial features should be, rather than copying them exactly. When you're drawing underwear remember that every clothing item will need to cover that underwear. So don't draw high necked, long legged underwear if you plan on making a lot of low necked, mini skirted dresses. It can be helpful to mark out the neckline and waistline of the underwear on your template before you start. And if you're going to draw a doll in a crinoline petticoat or long Victorian drawers you will need to have the outline of those drawn on your template. (Like there is on the third template above.) I like to give the dolls shoulder length hair because it helps hold the clothing tabs in place when they're dressed, but you don't need to have it that long. Just remember the hair has to stop above the shoulders or go behind them. It can't go in front of the body, the clothes will cover it if it does, anyway.
Once you've sketched the features and are happy with them, draw them in pen and you should end up with something like this

Cheat. If you're good at that kind of thing, you could use a program like photoshop to replace the template's head with a photograph and trace that out along with the body. I am not good at that kind of thing. I've tried it but find it nearly impossible to get the head the right size.
We'll come back to the doll later, when we've drawn some clothes.
Drawing the clothes.
To draw the clothes, transfer the outline again onto the paper. But just the part you need. If I'm drawing a t-shirt, I'll trace the outline of the arms and body down to just below the waist, marking in the neckline and elbows like this
Similarly for a skirt I'll trace the outsides of the legs, the waistline, mark the knees, and maybe the crotch (for a short short skirt) or ankles (for a long skirt). For pants you'll need to trace both the insides and the outsides of the legs.
Sketch in some detail in pencil and when you're happy with it, go over the outlines in pen.

Keep drawing clothing items until you think you have enough. (I've gone modern. They don't have to be modern. You could draw historical clothes or fantasy outfits, or even a bunch of animal costumes, whatever you like.) You can reuse each template until it stops transferring or tears through. I've done two tops, two bottoms, a dress and a pair of shoes.
Cheat. If you find you have trouble holding the template still to transfer it, you can cut the template out of cardboard and trace around the edges of it instead. It's not as precise but it's easier for kids or people without a lot of hand strength.
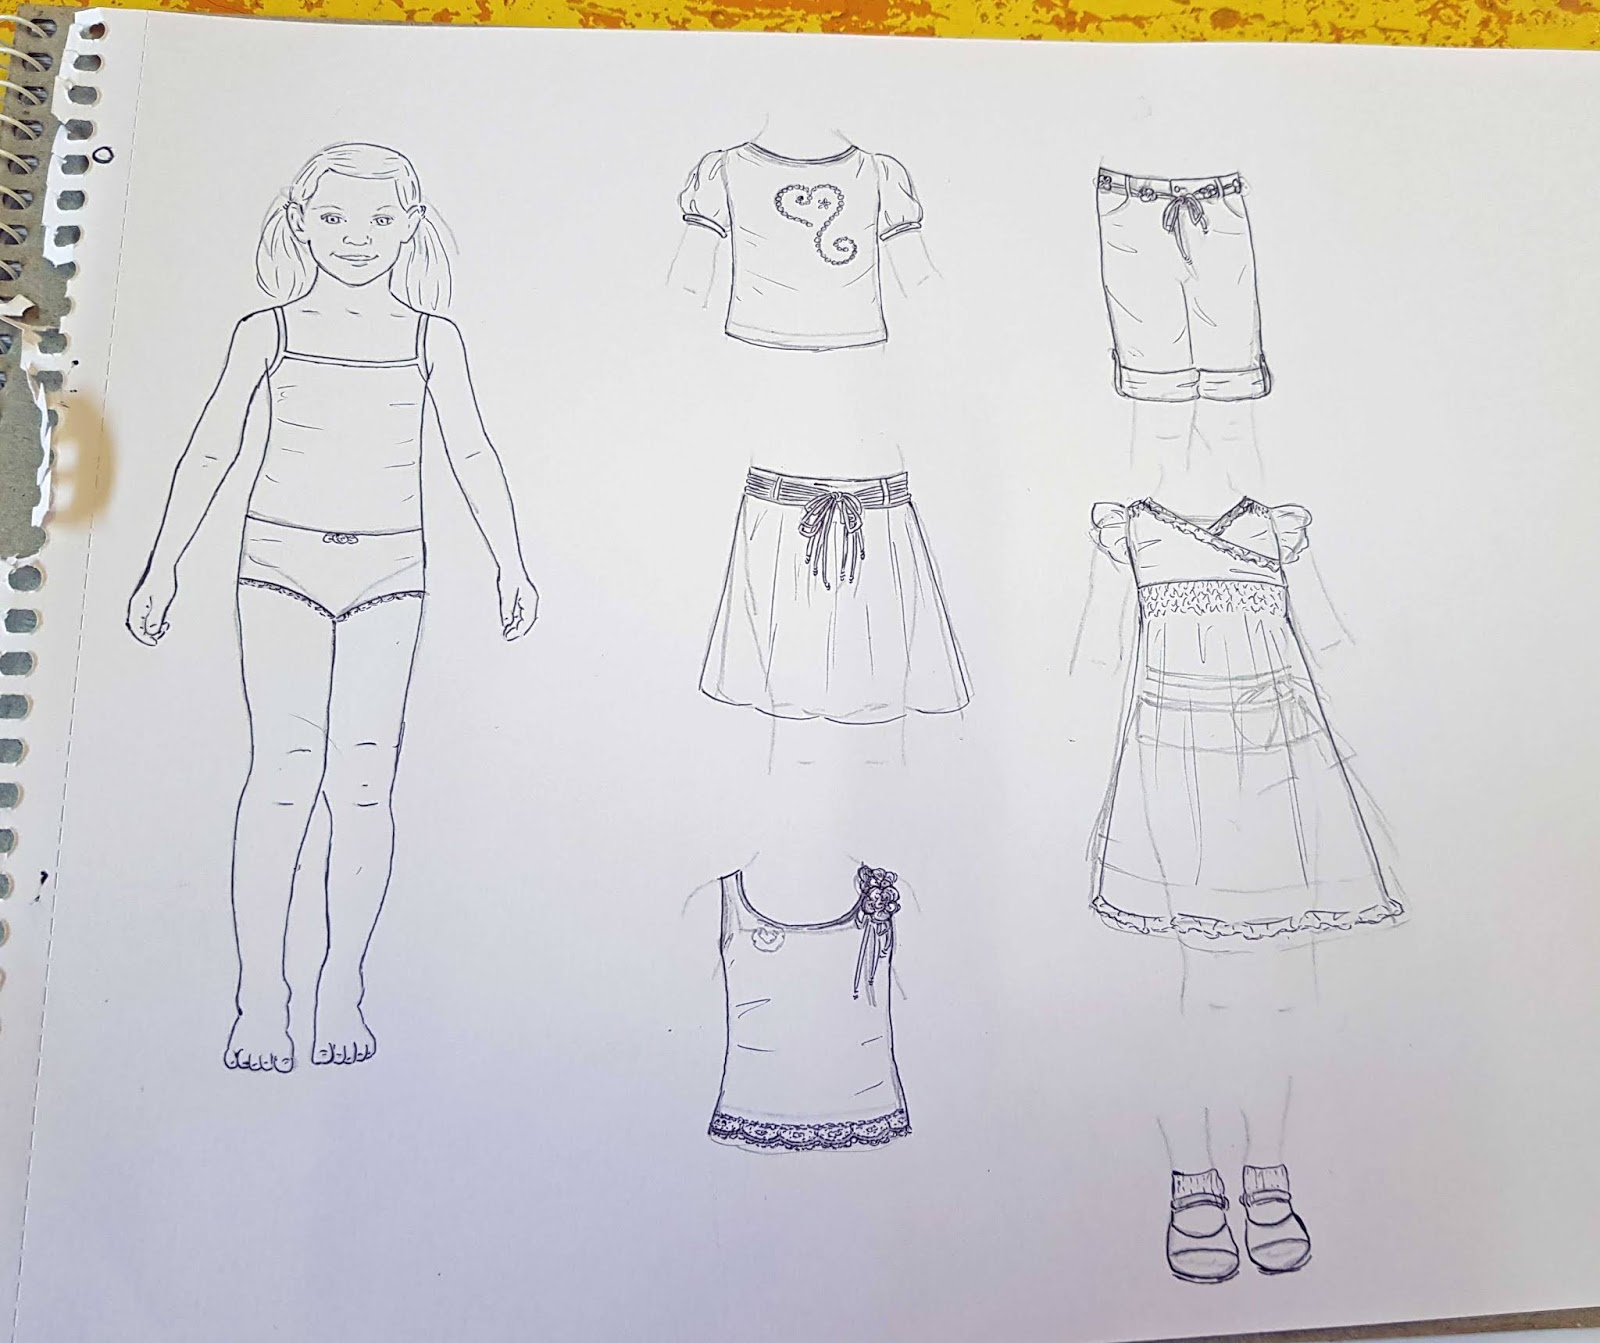
You can kind of tell here that I completely changed the design of the dress half way through. My original idea just wasn't working. . . I also turned the shoes into kitty shoes, after I took this picture. . . maybe even while I was painting.
Now wait until the ink is dry. How long depends on the type of pen and whether there are any blobs along the lines. (Incidentally, if you find ink blobs are building up on the tip of your pen, keep a tissue handy and wipe it occasionally.) I usually leave mine overnight, just in case. Then erase your pencil lines and it's ready to colour.
So this doesn't get uncontrollably long, I'm making this a two parter. Tomorrow I will show you how to paint the dolls with watercolours. If you don't want to paint with watercolours feel free to colour your dolls however you like now. I'm going to skip to after the dolls are coloured for the rest of this post so that anyone that doesn't care about watercolours doesn't miss the ending.
Finishing the doll.
Once your doll and her clothes are coloured (and dry if necessary) cut out a rough rectangle with the doll on it like this

Don't follow the lines at this point or when you glue her to card she'll stretch or get bent and her clothes won't fit. Also apparently I have no idea what a rectangle is.
Glue her to a sheet of card. You don't have to be fancy and buy special card. The cover of an old notebook would be fine. I try to use white card, because coloured or printed card sometimes discolours the doll or shows through.
Once the glue is dry, cut your doll out properly. Leave a bit of space below the feet, to write her name and add a stand.

You can use clothes pegs as a stand

Or Blu-Tack

Or if you have one you can use a stand! (You can sometimes get these in board games or little cardboard playsets)

(My doll has a bent arm because kids are . . . kids) I don't usually stand my dolls up at all so I was quite surprised to find that the actual stand was rubbish, she kept falling out of it. Blu-Tack was definitely best. Although you could just as easily use plasticine or anything else similar that you have.
And of course you need to cut the clothes out. Don't glue them to card or anything. Draw tabs on them first, to hold them on. At the shoulders, waist, bottom of long sleeves or pants, and at the ankles of shoes. Join the shoes together and cut them out in one piece. Also with long pants, cut the pants legs out as one piece, don't cut up between them or they'll curl up.

And then you can dress her and mix her and match her to your hearts content.


No comments:
Post a Comment